Difference between revisions of "SimpleBot Technical Overview"
(→Main Components) |
(→Battery Options) |
||
| (8 intermediate revisions by 2 users not shown) | |||
| Line 3: | Line 3: | ||
* For a brief summary of the SimpleBot, see the [[SimpleBot]] page instead. | * For a brief summary of the SimpleBot, see the [[SimpleBot]] page instead. | ||
* For a discussion of setting up SimpleBot's software, see the [[SimpleBot Initial Software Configuration]] page. | * For a discussion of setting up SimpleBot's software, see the [[SimpleBot Initial Software Configuration]] page. | ||
| + | |||
| + | == History == | ||
| + | |||
| + | The SimpleBot we are building is actually the "SimpleBot Pi", the fourth revision of the [http://github.com/ajfisher/simplebot SimpleBot designs] created by [http://twitter.com/ajfisher Andrew Fisher]. | ||
| + | |||
| + | This evolution of SimpleBot has also had input from [http://twitter.com/projectgus Angus Gratton], who designed the PiLeven and SimpleBot shield, and other members of the [http://hackmelbourne.org Melbourne Hackerspace] - including [http://twitter.com/alecthegeek Alec Clews] (software setup), [http://twitter.com/geekscape Andy Gelme], and [http://twitter.com/jonoxer Jon Oxer]. | ||
== Main Components == | == Main Components == | ||
| Line 10: | Line 16: | ||
The SimpleBot has 3 main components, stacked up as follows: | The SimpleBot has 3 main components, stacked up as follows: | ||
| − | * Raspberry Pi Model B+ runs Linux and can run any high-level programming language. Connects to Wifi via the attached adapter. Communicates with the PiLeven via serial port /dev/ttyS99. | + | * Raspberry Pi Model B+ runs Linux and can run any high-level programming language. Connects to Wifi via the attached adapter. Communicates with the PiLeven via serial port /dev/ttyS99. Comes with the [http://nodebots.io NodeBots] [https://github.com/rwaldron/johnny-five Johnny-Five] library installed. |
| − | * [http://freetronics.com/pileven Freetronics PiLeven] is an Arduino-compatible board that mounts on top of the Raspberry Pi. | + | * [http://freetronics.com/pileven Freetronics PiLeven] is an Arduino-compatible board that mounts on top of the Raspberry Pi. It can be loaded with the [http://firmata.org/ Firmata] firmware for direct control from the Pi. |
* The [http://github.com/freetronics/simplebot_shield SimpleBot Shield] provides an easy breakout for sensors connected to the PiLeven. | * The [http://github.com/freetronics/simplebot_shield SimpleBot Shield] provides an easy breakout for sensors connected to the PiLeven. | ||
| − | == | + | === Raspberry Pi === |
| − | |||
| − | |||
| − | |||
| − | |||
| − | |||
| − | = | ||
The Raspberry Pi is set up to run the node.js [https://github.com/rwaldron/johnny-five Johnny-Five Johnny Five library], which provides easy access to the hardware connected to the PiLeven (and abstracted via the Firmata framework). | The Raspberry Pi is set up to run the node.js [https://github.com/rwaldron/johnny-five Johnny-Five Johnny Five library], which provides easy access to the hardware connected to the PiLeven (and abstracted via the Firmata framework). | ||
| Line 30: | Line 30: | ||
As the Arduino IDE can be a little unwieldy to use remotely on the Raspberry Pi, we have also installed a tool called [http://inotool.org/ inotool] that makes it simple to build and upload Arduino sketches from the command line. Check the inotool documentation for more details. | As the Arduino IDE can be a little unwieldy to use remotely on the Raspberry Pi, we have also installed a tool called [http://inotool.org/ inotool] that makes it simple to build and upload Arduino sketches from the command line. Check the inotool documentation for more details. | ||
| − | == PiLeven == | + | === PiLeven === |
| − | [[File:PiLeven.jpg]] | + | [[File:PiLeven.jpg|400px]] |
The [http://freetronics.com/pileven PiLeven] is a 100% Arduino Uno compatible board in a Raspberry Pi form factor. It connects using the internal Raspberry Pi serial port, but can be programmed identically to an Arduino Uno connected via USB. | The [http://freetronics.com/pileven PiLeven] is a 100% Arduino Uno compatible board in a Raspberry Pi form factor. It connects using the internal Raspberry Pi serial port, but can be programmed identically to an Arduino Uno connected via USB. | ||
| Line 40: | Line 40: | ||
For more information on PiLeven, see the [http://www.freetronics.com.au/pages/pileven-getting-started-guide PiLeven Getting Started Guide] and also the [https://github.com/freetronics/PiLeven/wiki/Direct-Control-with-Firmata wiki article on using PiLeven with Firmata]. Note that the Raspberry Pi software for PiLeven is already installed on the image we supply at the MiniConf. | For more information on PiLeven, see the [http://www.freetronics.com.au/pages/pileven-getting-started-guide PiLeven Getting Started Guide] and also the [https://github.com/freetronics/PiLeven/wiki/Direct-Control-with-Firmata wiki article on using PiLeven with Firmata]. Note that the Raspberry Pi software for PiLeven is already installed on the image we supply at the MiniConf. | ||
| − | == SimpleBot Shield == | + | === SimpleBot Shield === |
[[File:SimpleBot shield mounted.jpg|400px]] | [[File:SimpleBot shield mounted.jpg|400px]] | ||
| Line 46: | Line 46: | ||
The [http://github.com/freetronics/simplebot_shield SimpleBot Shield] provides easy connections for the following hardware: | The [http://github.com/freetronics/simplebot_shield SimpleBot Shield] provides easy connections for the following hardware: | ||
| − | * 2 | + | * 2 specially located "motor" hobby servo pinouts, connected to pins D9 & D10. |
* 4 additional hobby servo pinouts, pins D2,D3,D5,D6. | * 4 additional hobby servo pinouts, pins D2,D3,D5,D6. | ||
| − | * Dedicated 6V linear regulator for | + | * Dedicated 6V linear regulator for servo power (hobby servos usually run better on 6V than 5V). |
* Ultrasonic Rangefinder Sensor connected to pin D8. | * Ultrasonic Rangefinder Sensor connected to pin D8. | ||
* LDR connected as voltage divider to pin A0, provides voltage indication of ambient light level. Can be bent directionally to provide a directional light sensor. | * LDR connected as voltage divider to pin A0, provides voltage indication of ambient light level. Can be bent directionally to provide a directional light sensor. | ||
* 4 WS2812B RGB LEDs, aka "NeoPixels". Data pin is pin D6, LEDs are daisy chained from there. Can be used for ambient effects, feedback, or as signals which are received via the light sensor. | * 4 WS2812B RGB LEDs, aka "NeoPixels". Data pin is pin D6, LEDs are daisy chained from there. Can be used for ambient effects, feedback, or as signals which are received via the light sensor. | ||
* 5 Analog input pins (also usable as digital) broken out on screw terminals, along with power and ground. | * 5 Analog input pins (also usable as digital) broken out on screw terminals, along with power and ground. | ||
| − | * Breakout for [http://freetronics.com/imu9 | + | * Breakout for [http://freetronics.com/imu9 Freetronics IMU9 module] (not supplied). |
* "Serial" 4 pin breakout for connecting other devices. | * "Serial" 4 pin breakout for connecting other devices. | ||
| − | == | + | == Battery Options == |
[[File:SimpleBot batteries in pack.jpg|100px]] | [[File:SimpleBot batteries in pack.jpg|100px]] | ||
| Line 65: | Line 65: | ||
It is also possible to use a 7.2V lithium cell as a battery for the SimpleBot. | It is also possible to use a 7.2V lithium cell as a battery for the SimpleBot. | ||
| + | |||
| + | |||
| + | [[SimpleBot|Back to SimpleBot]] | ||
Latest revision as of 06:52, 10 January 2015
This page aims to give an overview of the technical architecture of the SimpleBot.
- For a brief summary of the SimpleBot, see the SimpleBot page instead.
- For a discussion of setting up SimpleBot's software, see the SimpleBot Initial Software Configuration page.
Contents
History
The SimpleBot we are building is actually the "SimpleBot Pi", the fourth revision of the SimpleBot designs created by Andrew Fisher.
This evolution of SimpleBot has also had input from Angus Gratton, who designed the PiLeven and SimpleBot shield, and other members of the Melbourne Hackerspace - including Alec Clews (software setup), Andy Gelme, and Jon Oxer.
Main Components
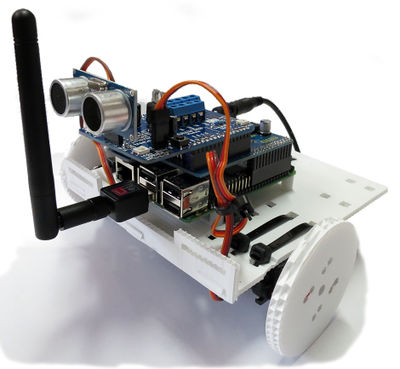
The SimpleBot has 3 main components, stacked up as follows:
- Raspberry Pi Model B+ runs Linux and can run any high-level programming language. Connects to Wifi via the attached adapter. Communicates with the PiLeven via serial port /dev/ttyS99. Comes with the NodeBots Johnny-Five library installed.
- Freetronics PiLeven is an Arduino-compatible board that mounts on top of the Raspberry Pi. It can be loaded with the Firmata firmware for direct control from the Pi.
- The SimpleBot Shield provides an easy breakout for sensors connected to the PiLeven.
Raspberry Pi
The Raspberry Pi is set up to run the node.js Johnny-Five Johnny Five library, which provides easy access to the hardware connected to the PiLeven (and abstracted via the Firmata framework).
Of course you don't have to use node.js or Johnny Five - you can program the PiLeven directly as if it was an Arduino Uno, or you can use any of the dozens of Firmata language bindings with your favourite programming language.
As the Arduino IDE can be a little unwieldy to use remotely on the Raspberry Pi, we have also installed a tool called inotool that makes it simple to build and upload Arduino sketches from the command line. Check the inotool documentation for more details.
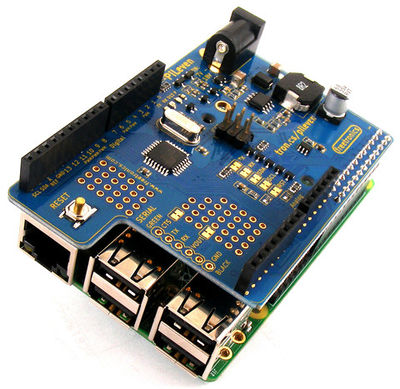
PiLeven
The PiLeven is a 100% Arduino Uno compatible board in a Raspberry Pi form factor. It connects using the internal Raspberry Pi serial port, but can be programmed identically to an Arduino Uno connected via USB.
PiLeven also incorporates a high-efficiency DC/DC buck converter which allows the Pi to be powered from voltage sources higher than 5V, such as the 9V battery pack on the SimpleBot.
For more information on PiLeven, see the PiLeven Getting Started Guide and also the wiki article on using PiLeven with Firmata. Note that the Raspberry Pi software for PiLeven is already installed on the image we supply at the MiniConf.
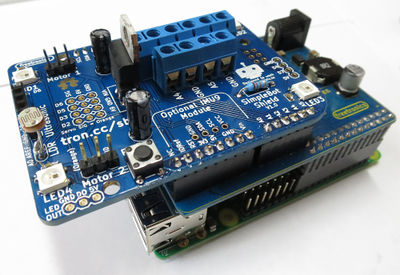
SimpleBot Shield
The SimpleBot Shield provides easy connections for the following hardware:
- 2 specially located "motor" hobby servo pinouts, connected to pins D9 & D10.
- 4 additional hobby servo pinouts, pins D2,D3,D5,D6.
- Dedicated 6V linear regulator for servo power (hobby servos usually run better on 6V than 5V).
- Ultrasonic Rangefinder Sensor connected to pin D8.
- LDR connected as voltage divider to pin A0, provides voltage indication of ambient light level. Can be bent directionally to provide a directional light sensor.
- 4 WS2812B RGB LEDs, aka "NeoPixels". Data pin is pin D6, LEDs are daisy chained from there. Can be used for ambient effects, feedback, or as signals which are received via the light sensor.
- 5 Analog input pins (also usable as digital) broken out on screw terminals, along with power and ground.
- Breakout for Freetronics IMU9 module (not supplied).
- "Serial" 4 pin breakout for connecting other devices.
Battery Options
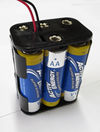
The standard power source for the SimpleBot is 6x AA alkaline cells for a nominal 9V battery pack. In testing a SimpleBot has run actively (driving motors in a sequence) for over 4 hours before batteries were depleted, with wifi enabled.
Unfortunately we've found that rechargeable NiMH AA cells were not able to supply enough current to boot the Raspberry Pi, the initial power-on surge caused an execessive voltage drop. If you'd like to use rechargeable AAs, we suggest sourcing a 8x AA "12V" two-row battery pack, like a wider version of the 9V pack. This will fit in the space under the SimpleBot chassis, and gives enough capacity for rechargeable batteries.
It is also possible to use a 7.2V lithium cell as a battery for the SimpleBot.


